Adding to my eclectic mix of blogs here.....
A couple of people have asked about the shrug that Ayla was wearing in this post. I originally saw the idea for it in a Japanese Knitting book but changed it considerably because of course, I most definitely couldn't just stick to the pattern and use what they suggested.....far too normal.
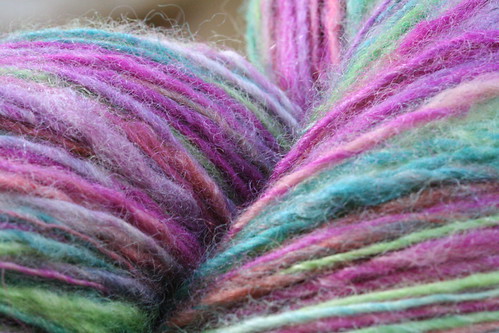
I used my own handspun yarn (pictured above). It is a blend of 90% Blue Faced Leicester and 10% angora bunny...hence the Bunny Shrug, and it is so incredibly soft. If you want to buy some of this fibre for spinning or you would like to buy the already spun yarn.....contact Charly from Ixchelbunny. I struggle to wear anything other than cotton on my skin because I have eczema but I have to say that the addition of the angora rabbit makes an incredible difference. I put my arm inside one of the sleeves for an hour to see how I would react and it didn't itch once!
So the pattern.....
This pattern is a kinda try and grow as you go sorta pattern. Don't let that put you off though because it is such an easy pattern. Basically, you knit the shrug like a scarf (see! you can do a scarf!) and then you stitch up the sleeves like a cylinder but leave the middle bit open....promise to take a photo in the morning.
I used ~4 ply yarn with 5mm needles. I used the larger needles because I wanted a really light shrug for the cool mornings we have on the mountain.
Ayla is a size 4 so I cast on 50 stitches. You need enough stitches that it fits comfortably around the largest part of their arm, so it is quite loose at the wrist. I did 10 rows of seed stitch...so thats:
Row 1, 3, 5, 7, 9: k1, p1
Row 2, 4, 6, 8, 10: p1, k1
And then it's just stocking stitch until the sleeve reaches from the wrist to the centre of the back (between the shoulder blades). Make sure that when you measure it, have your little one's arms stretched out in front. Put these stitches on to a stitch holder or a piece of remnant wool.
Repeat all over again for the second sleeve.
Then thread the stitches on the stitch holder back onto the empty needle and use Kitchener stitch to seamlessly bind them together. And just to help out....here is the best tutorial I have found for the Kitchener Stitch.
Ta Da!!!! You're Finished....Yay You!


7 comments:
Ya you! thank you very much...I will make one. do you think it is too much to have four projects cast on at once?
Hahaha that sounds way too complicated for me.. but I love the colors!!
I found your blog via another blog .... Just want to make a Swedish footprints behind me. Your blog is wonderful and I will gladly come back!
Agneta
Aww Thanks Agneta! Your welcome here anytime :)
Hi, I live an hour out of Sydney and my 4 year old daughter has many medical conditions one of which is polymicrogyria. Would love to keep in touch.
Sounds like we may have a few things in common Sarah :).
Have you come across www.schuylersmonsterblog.blogspot.com
This is a dad writing about his daughter with PMG....very good read and lots of useful information.
Oh thanks for the link, I will check it out now.
Post a Comment